
Christine King BVSc, MANZCVS (equine), MVetClinStud
Saddle fit basics
fit and placement from the horse's perspective
Spring presents you with a great means of checking your saddle fit and balance: as your horse sheds his winter coat, look for uneven patterns of shedding in the saddle area on your horse’s back and/or on the underside of your saddle pad or blanket. (Uneven sweating under the saddle can be a give-away, too.) The packing or stuffing in saddles with padded panels — English saddles, for example — shifts and settles with use, so you should have your saddle checked at least once a year, and perhaps twice a year if you ride a lot in that saddle and (like almost all of us) you are not perfectly even in the way you stand, sit, and use your body.
When your saddle needs restuffing, it is common to see two roughly circular areas of greater shedding located directly under your seat bones, one on either side of the horse’s back. (And if you sit unevenly, then there may be just one of these spots, on the side to which you sit the heaviest.) Or you may simply see a couple of extra-hairy patches on the underside of your saddle pad which correspond to this same area on the horse’s back. These discrete areas of greater shedding indicate that your saddle is providing inadequate protection for the horse’s back under your seat bones.
Uneven shedding of the winter coat under the saddle can also reveal other patterns of poor saddle fit, such as bridging, rocking, or tipping. Bridging means that there are points of contact at the front and back of the saddle, and little or no contact in between. You may be able to slip your fingers between the horse’s back and the panel of the saddle if there is substantial bridging. Rocking is the opposite pattern, where there is greater contact in the middle of the saddle than at both ends. The saddle can be rocked on the horse’s back from pommel to cantle when this problem is present. Tipping means that the saddle tips forward or back, so more of your weight is concentrated toward the front or back of the saddle, rather than being evenly distributed along the entire length of the tree.
Basics of good saddle fit
Good saddle fit is essential for good performance. A poorly fitted saddle is uncomfortable for the horse, and at the very least it causes a protective bracing response in the muscles along the back which extends forward into the lower part of the neck and all the way back to the pelvis and sacrum (in the rump). This bracing alters the horse’s gait, balance, evenness, efficiency, and ability. Over time, poor saddle fit can even contribute to lameness and persistent behavioral problems. Furthermore, it makes it difficult for you to be comfortable, balanced, relaxed, and effective up there.
Following is a brief primer on saddle fit, from the horse’s perspective. That’s the most important and usually the hardest part of the whole equation; there is no saddle that will work well for you if it doesn’t also work well for your horse.
These are the fundamentals of good saddle fit:
- width — the saddle must be wide enough for the individual horse
- position — the saddle must be placed correctly on the horse’s back
- clearance — the saddle must be clear of the horse’s spine along its entire length
- length — the saddle must be of appropriate length for the individual horse’s back
- weight distribution — the saddle must spread the rider’s weight evenly over a wide area
- balance — the saddle must be well balanced so that the rider can be well balanced, too
Width
Perhaps the most important aspect of saddle fit, in terms of the horse’s comfort, is that the angle of the saddle tree (the solid frame of the saddle) at the front of the saddle must be wide enough to clear the horse’s rib cage (see Figures 1 and 2).
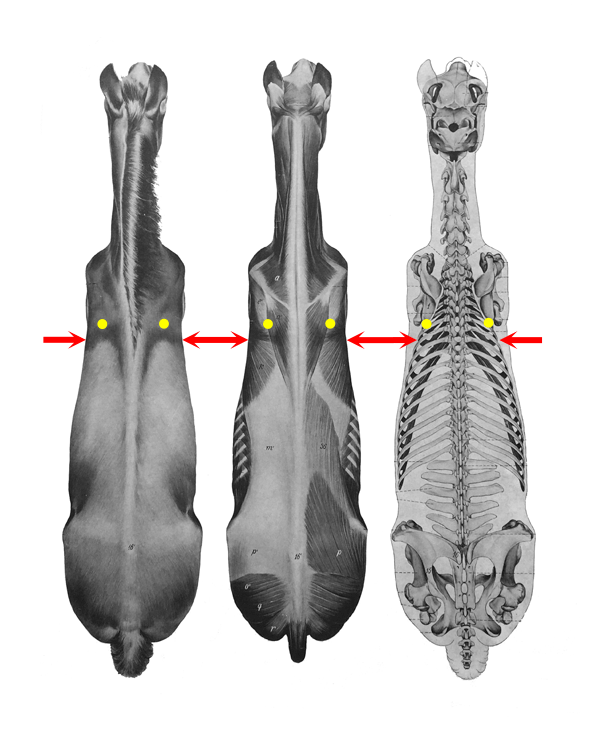
Figure 1. View of the horse from above. The yellow dots indicate the back of the shoulder blade. The red arrows indicate the widest part of the rib cage just behind the shoulder blade. [Adapted from Atlas of Animal Anatomy for Artists, by W. Ellenberger, H. Baum, and H. Dittrich. Dover Publications, 1949, 1956. These wonderful illustrations were first published in 1901.]
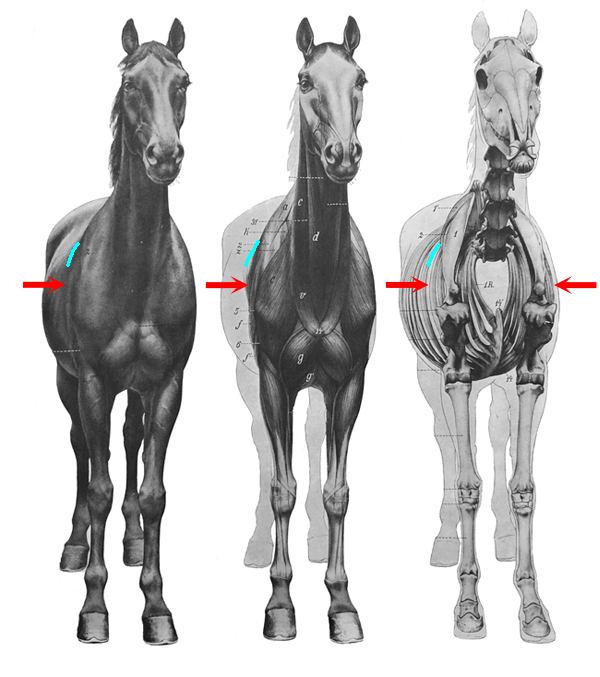
Figure 2. View of the horse from the front. The red arrows indicate the widest part of the rib cage just behind the shoulder blade. The blue lines on the horse's right side show the orientation or 'angle' that the arms of the U-shaped saddle tree need to have so that the ends ('points') of the tree don't put any pressure on the horse's ribs. [Adapted from Atlas of Animal Anatomy for Artists, by W. Ellenberger, H. Baum, and H. Dittrich. Dover Publications, 1949, 1956.]
The front of the sadde tree forms an upside-down U. The angle of the U, or the distance between the tips (or points), determines the width of the tree. Numerical measurements aren't all that important; it's whether or not the tree is wide enough for the individual horse that matters.
As you can see in Figures 1 and 2, the horse’s ribs curve inward as they come up to meet the spine. That’s actually what you sit on when you ride a horse: the “shelf” created by the tops of the ribs, and the pad of muscles which overlies it on either side of the spine. It is essential that the angle of the U at the front of the saddle tree be wide enough that the points clear the rib cage entirely.
At the same time, it must not be so wide that the saddle rests on the tops of the bony spinous processes of the wither. The channel or gullet of the saddle must clear the wither with plenty of room to spare when the rider’s weight is in the saddle.
A saddle that is too narrow for the horse puts pressure on the muscles overlying the tops of the ribs. It causes pain, bruising, and eventually muscle wasting (hollowing) in that area just behind and below the wither.
A narrow saddle is a punishment to the horse! It is better to use a saddle that is a little wider than needed, especially in a young horse (whose shape will continue to change as he matures and training progresses). You can use saddle pads if necessary to ensure that the saddle doesn’t put any pressure on the spine. Just make sure that no new pressure points are created by padding up this poorly fitting saddle.
Trying to make a badly fitting saddle fit better by using thick or strategically placed saddle pads is like you trying to improve the fit of ill-fitting shoes by wearing thick socks or using sole inserts. These measures are a poor substitute for finding a pair of shoes that fit your feet well.
And as with shoe sizes in people, it can be misleading to go by the saddle maker’s definition of tree width, as the actual dimensions vary among saddle brands. There are few standards in the saddle industry, so while a “medium” in one brand may fit your Thoroughbred nicely, a “medium” in another brand may be too narrow for this horse. Don’t go by your horse’s breed or height, either. The critical factor is the width of the rib cage just behind the wither, and that’s a highly individual thing. Bottom line: you must try the saddle on your horse to see if it fits.
If you’re not sure where the tree is in your saddle and if your saddle is wide enough for your horse, place the saddle (without saddle pad) on the horse’s back, stand by the horse’s neck facing towards his hindquarters (a similar perspective to that in Figure 2), and look at the angle made by the piping (the thin roll of leather) at the front of the saddle. If the upside-down U shape made by this piping as it runs from one side of the saddle, over the front of the pommel, and back down the other side appears to clear the widest part of your horse’s back just below the wither, then you’re probably alright widthwise.
Unfortunately, that doesn’t guarantee that the saddle is comfortable for your horse, though. The stuffing in the panels at the front of the saddle can create pressure points, too, if the panels are overstuffed to make up for hollowing (muscle atrophy) just behind/below the wither, are unevenly stuffed, or have become lumpy over time.
To check the panels at the front of your saddle, stand in the same place as before and gently lift the front of the saddle away from the horse’s back an inch or so and eyeball the contour of the panel in relation to the contour of the horse’s body at that location. They should match down the entire length of the contact area.
It’s also possible to tell if a saddle has been fitting comfortably just by feeling the skin and the tone of the muscles and fascia (connective tissue) in the saddle area, checking for areas of unusual sensitivity, hot or cool spots, swellings or depressions, etc. (But that’s a topic for another time, perhaps even a hands-on workshop.)
Position
The saddle should be positioned on the horse’s back such that the front of the tree is behind the back of the horse’s shoulder blade (see Figure 3). It is important to leave room for the top of the shoulder blade to rotate back a little during the forward swing phase of the stride, otherwise the horse’s reach is restricted. Placing the saddle far enough back that the shoulder blades are free also puts your weight where it should be on the horse’s back (assuming that the saddle is well balanced and of appropriate length for that horse).
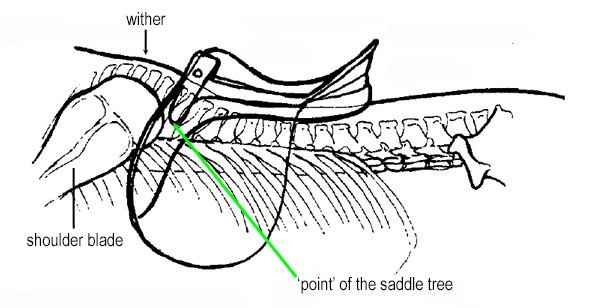
Figure 3. Correct position of an English saddle. The front of the tree (shown here by a green arrow) should be behind the back of the horse’s shoulder blade. The panel or flap of the saddle may extend forward a little way, particularly on a jumping saddle. The important component is the position of the saddle tree in relation to the shoulder blade.
With jumping saddles, the front of the flap and knee pad does extend forward over the horse’s shoulder blade. But provided the saddle is not placed too far forward, this part of the saddle does not restrict the horse’s movement, as the shoulder blades are free to move under the flap. It is the location of the tree and underlying panels which is the important factor, as these are the parts of the saddle that are girthed snugly to the horse’s body.
Clearance
No part of the saddle should contact any part of the horse’s spine. The saddle must not put any pressure on the bony spinous processes at the wither; it should not even be close to touching the wither. Be sure to recheck this point with a rider in the saddle and, for jumping horses, when all of the rider’s weight is on the stirrups. If the saddle rides too low on the wither, then have a reputable saddler restuff the saddle, or replace the saddle. Don’t rely on saddle pads to protect the horse’s wither.
The panels of the saddle must not rest on the horse’s spine, but rather on the muscles either side of the spine. To ensure adequate clearance on both sides of the spine, make sure there is a space at least 2 inches wide (for most women, that’s 3 finger widths) along the entire length of the channel or gullet (see Figure 4).
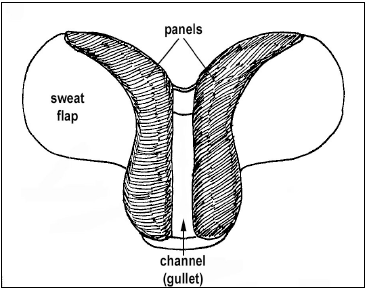
Figure 4. View of the underside of an English saddle. The channel or gullet should be at least 2 inches (approx. 3 finger widths) wide along its entire length so that it clears the horse’s spine. The panels should apply even pressure over their entire contact area.
Length
The weight-bearing portion of the saddle must not extend further back than the horse’s last rib. The length of the horse’s rib cage (in other words, the length of the thoracic spine), not the length of the back as a whole, determines appropriate saddle length for that horse. The saddle depicted in Figure 3 is of appropriate length for this horse’s back, even though it appears to extend further back than the last rib. Remember that the panel curves upward, away from the horse’s back at the cantle, so the weight-bearing portion of the panel is a little shorter than the actual length of the panel.
Weight distribution
The tree and panels should apply even pressure all the way along the weight-bearing portion of the saddle. There should be no bows in the tree, no high/low spots in the panels, and the saddle should not rock or bridge, as these defects in fit cause areas of excess pressure on the horse’s back. Turn the saddle over and examine the panels with your eyes and hands, checking carefully for high or low spots, lumps, soft spots, and any other indicators that the saddle may not be placing even pressure along the horse’s back. Run your eyes and hands over the horse’s back, too.
The greater the surface area of the panel, the less pressure there is on any one part of the horse’s back. (For the mechanically minded, that means fewer pounds per square inch.) So, when buying a saddle, try to choose one that has broad panels.
Balance
In addition to being stable and comfortable on the horse’s back (i.e., having a broad area of even panel contact), the saddle must allow the rider to sit evenly and be in balance; it must not tip the rider forward or back, or to one side or the other.
A well-balanced saddle puts the rider in the right place on the horse’s back, allows the rider to be in balance, and applies even pressure over the horse’s back (see Figure 3, above). A saddle that tips back shifts the rider’s weight too far back, tips the rider out of balance, and creates pressure points on the horse’s back (see Figure 5, below).
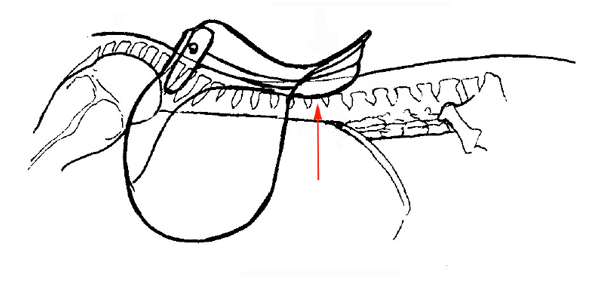
Figure 5. A saddle that tips back shifts the rider’s weight too far back, tips the rider out of balance, and creates pressure points on the horse’s back.
A saddle that tips forward shifts the rider’s weight too far forward, tips the rider out of balance, creates pressure points just behind/below the wither, and may interfere with movement of the horse’s shoulder blades (see Figure 6).
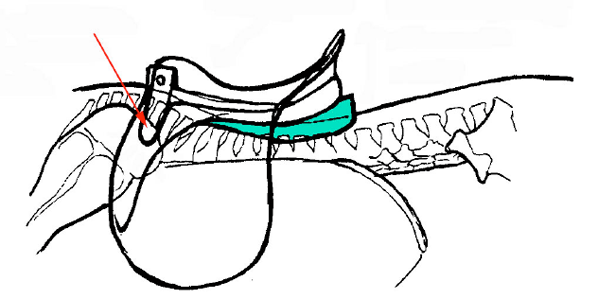
Figure 6. A saddle that tips forward (with or without the aid of a wedged pad or riser) shifts the rider’s weight too far forward, tips the rider out of balance, creates pressure points just below the wither, and may interfere with movement of the horse’s shoulder blades.
And if you’re an uneven rider (which many of us are), your saddle may develop a torque or twist over time. (My office chair — one of those kneeling chairs that’s supposed to keep me in a good position — has some torque in it now, from years of uneven loading.) So, in addition to checking the panels for unevenness in the packing, eye the entire length of the saddle for subtle twisting. It can help to place the saddle on a saddle stand or on a drum (laid on its side), step back a few feet, and walk around it, comparing the symmetry of the panels and seat from the front, back, sides, and above. Often the most obvious place to see twisting is in the cantle; compare the height of the left and right sides from the back.
Well, if I’ve gotten you all fired up to go out and check your saddle and your horse’s back — good! I just can’t stress strongly enough how important it is for your horse’s well-being and performance that your saddle be comfortable for you both. Next time you go to the barn, give your saddle, saddle pad, and horse’s back a close inspection. And after your next ride, pay attention to sweat and shedding patterns on your horse’s back and on the underside of the saddle pad. If anything seems amiss, have a reputable saddle fitter check your saddle and adjust it if necessary.
***
Copyright © 2006 Christine M. King. All rights reserved.
This article was first published in Horses, Incorporated (www.horsesinc.net).